New scans: which skate and side?
New scan
Rocker and bend
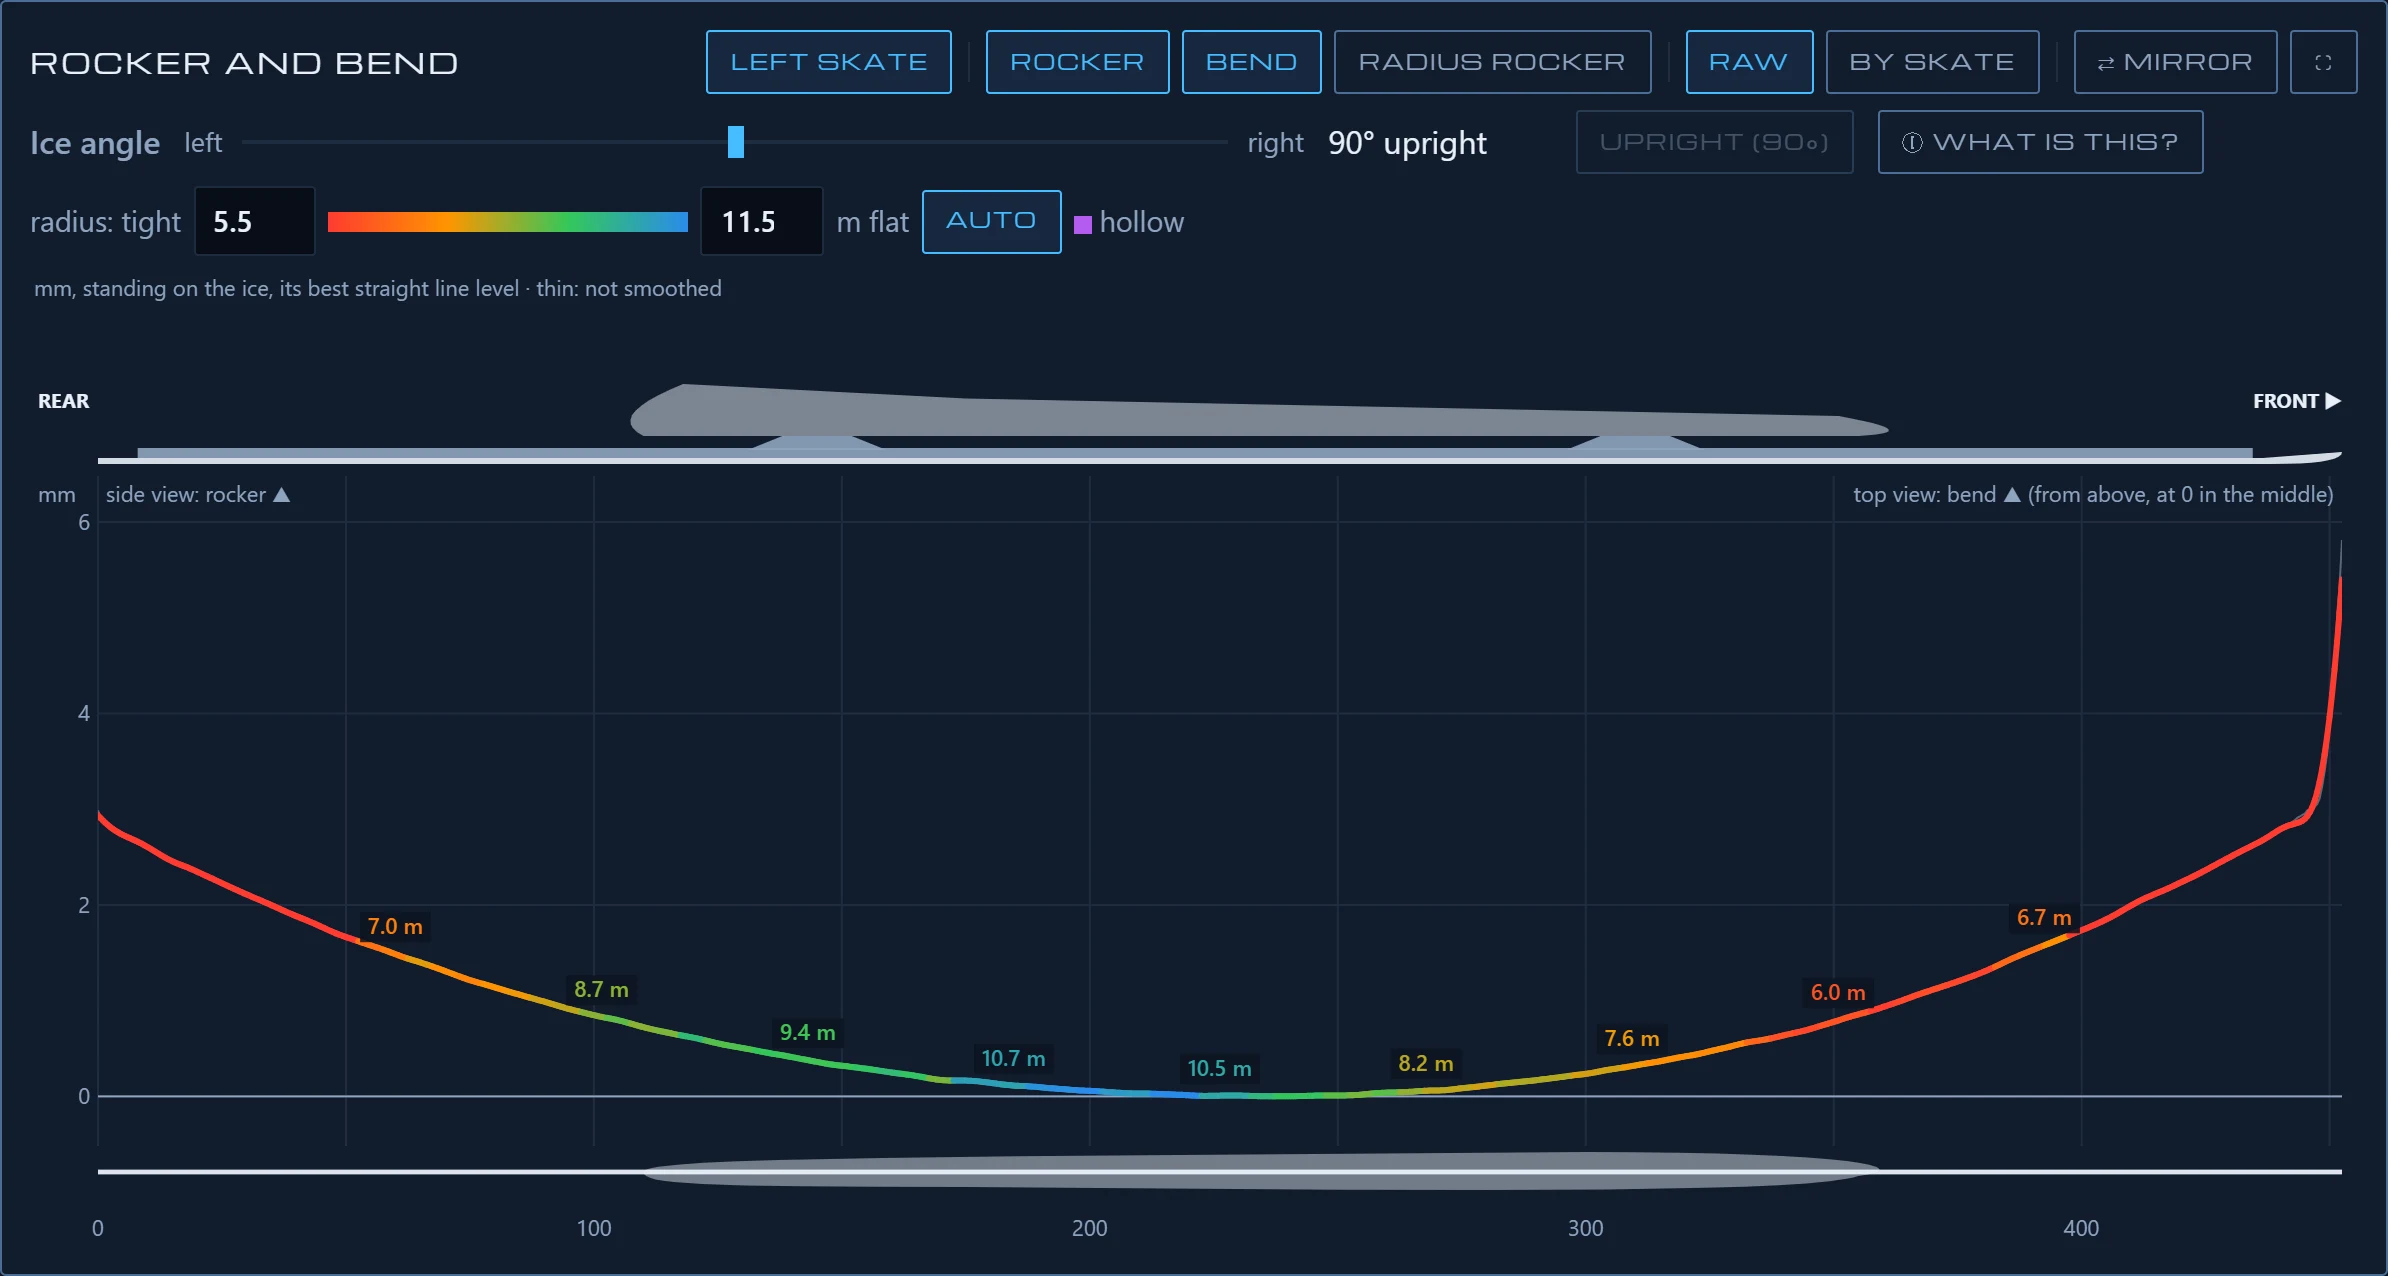
Ice angle: how the blade meets the ice when the skater leans. At 90° the blade stands upright: the side view is the rocker as measured, the top view the bend.
Leaning, the two mix: the side view becomes the edge's height over the ice, the top view its line on the ice. Leaning left into a turn (below 90°), a regular bend's tips come down toward the ice, so less rocker is left between its tips and the ice, and seen from above the blade curves with the turn; at 0° (flat on its side) the bend itself is the profile on the ice, touching at the tips. Leaning right (above 90°, out of the turn) it is the other way round.
Snaps to 90° near upright. The radius labels and the radius graph follow the side view.
Zoom: drag a box over the part to see (a flat box: along the blade; a tall one: up and down). Wheel: along, Shift + wheel: up and down, Shift + drag: move. Double-click: the whole graph.Zoom: pinch, sideways or up and down; drag to move; double-tap: the whole graph.
How these curves were made
CSV: the numbers, to open in a spreadsheet. Save: the scans themselves, as a file to come back to. Open: a file saved before, back into the app — with nothing scanned here yet, as your skates; with scans here, dashed next to them to compare. Example: one blade the app measured itself, to try the graphs on without scanning anything.
Blade Inspect, developed by Mark Prinsen. A phone, a ruler and a few parts from the hardware store, to see your own blades without sending them anywhere. Check critical values, and scan again when in doubt; no liability. See What it does.
Your scans are kept only in this browser on this device: nothing is uploaded or shared. Save them to a file to keep your own copy (clearing the browser's data removes them here).
Measuring
- 1Ruler edge
- 2Stitch
- 3Check & measure
Lock the focus on the running edge; a short exposure (2–4 ms, with good light) keeps the frames sharp while the sled moves. Controls the browser doesn't offer for this camera are left out.
The ruler's edge
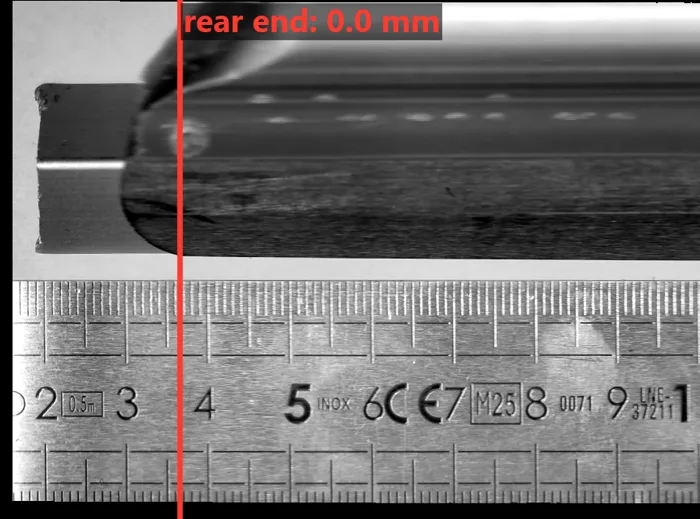
The white slit between the ruler and the blade is found by itself and shown blue: its edge on the ruler's side (green) is what everything is measured from. Not right? Tap inside the white slit.
Stitching…
Check and measure
The lines mark where the blade starts to round off at its ends; drag them if needed.
The stitched band at full resolution (check for jumps)
Measure your skates with your phone
Slide your phone along the blade, upload the video, and see your blade's rocker and bend over its whole length — against the ruler that lies beside it in the picture.
Your data stays yours. Everything runs in your browser: your videos and measurements never leave your device, nothing is uploaded or shared, there is no account. The page is not even allowed to connect anywhere: its security policy blocks it. Save your scans or export the readings as a file to keep them wherever you like.
About
Blade Inspect is developed by Mark Prinsen, and built on years of speed skating experience.
Disclaimer. Blade Inspect is a tool to look at your own blades: a phone, a ruler and a few parts from the hardware store. It is developed and verified against physical gauge measurements.
A measurement is only as good as how straight your ruler is and how well the scan is aligned. Within that, what it reads is accurate enough to match what you feel on the ice, to follow what changes on a blade and to compare blades and scans. It is not laboratory equipment: no telecentric lenses, no calibrated DIN 874 straightedge. Don't worry about a digit after the decimal point — you won't feel it on the ice, and with a physical gauge it is sometimes just as hard to tell which tick is the exact value. Use the video your phone recorded, not a copy that went through a messaging app: WhatsApp and the like compress it until the blade's edge and the ruler's numbers blur, and blur measures worse.
Check critical values yourself, and scan again when in doubt. Blade Inspect and its developer accept no liability for any damage, injury or loss arising from using the app or from acting on its results, including work done on blades.
Hardware
What you need
- A phone with a torch (flash), its camera able to focus at 10–15 cm.
- A flat steel ruler, 50–60 cm: its edge is the straight line everything is measured from.
- White paper under the blade, so the edge stands out.
- For rocker + bend: a 15 × 15 mm aluminium angle (the blade lies on it at 45°) and a support pad under the boot. For rocker only: a board to lay the blade and the ruler on.
- A way to slide the phone steadily along the blade: a rig.
The rig
All the scan needs is a steady sideways movement: the phone about 150 mm above the blade, looking straight down at it (the camera square over the edge), sliding evenly along it. Zoom in so that the blade's edge runs through the middle of the picture, with the ruler's numbers in view: what is under the middle of the lens is seen square, and an edge off to one side is seen slanted, which shifts the rocker and bend a little. It needs about 60 cm of travel (a whole blade, a little past both ends). A sharp picture all the way along matters more than the lowest height: rather a centimetre higher with the camera zoomed in a little to fill the view (the ruler's edge and its numbers in view, the running edge through the middle of the picture) than so close that the focus hunts. Any setup that does that works: a phone sliding along a stack of books or your own creation, as long as the movement is steady, the height stays the same and the picture stays sharp. Rig A and rig B are two ideas, simple to build from parts any hardware store sells.
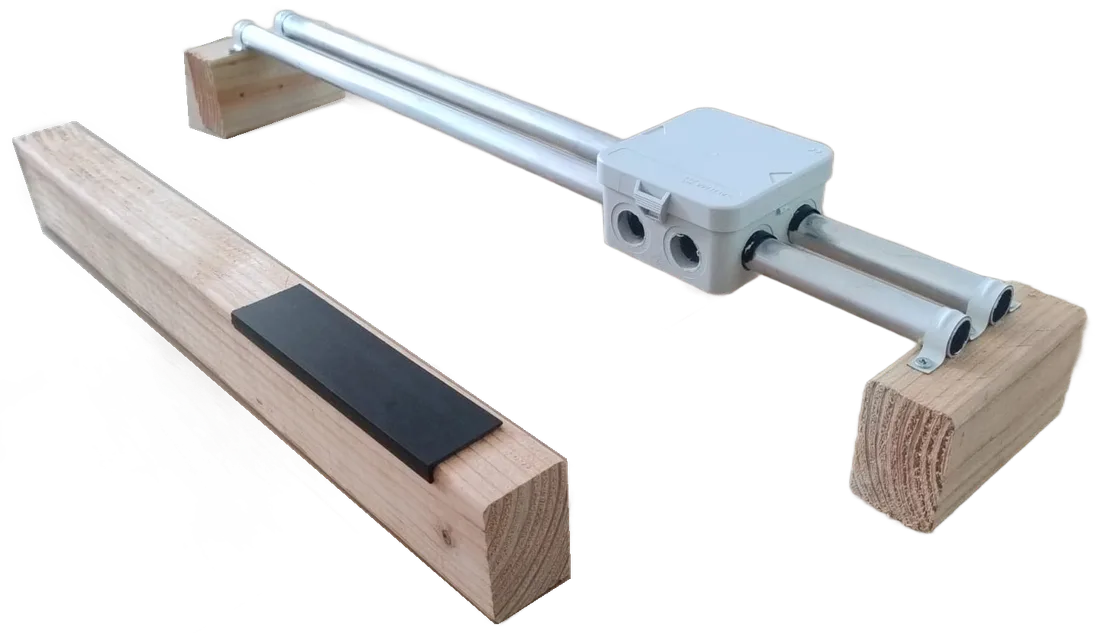
Rig A · an L-profile on a beam
The phone lies on a sled: a short L-profile, just the beam's width, that hooks round a straight wooden beam, so the camera stays at one distance and height all along the blade.
- A straight wooden beam, about 70 cm: the sled runs along it.
- A plastic L-profile (a corner strip from the hardware store), the width of the phone, hooked over the beam.
Rig B · a junction box on two tubes
A sled that slides on two tubes: quick to build from electrical installation parts, smooth, and level along the whole blade.
Parts
- 2 × steel installation tube, Ø 20 mm, 65–70 cm long (a 2 m tube gives three of them).
- 2 wooden blocks as feet, high enough to lift the tubes clear of the skate.
- 4 tube clips (Ø 20 mm) and screws.
- 1 surface junction box with M20 entries (kabeldoos).
- Self-adhesive velcro, the soft (loop) side.
Building it
- Drill the box's M20 entries through both opposite walls, as far apart as the tubes will be: first with a 20 mm drill, then widen them to 22 mm.
- Line the holes inside with a strip of the soft velcro: the box then glides smoothly over the tubes without play.
- Slide the box onto both tubes and clip the tubes onto the blocks, parallel.
- Lay the phone on the box, camera looking straight down at the running edge and the ruler.
The ruler: flat steel, 50–60 cm, for a straight edge the length of the blade. A good steel ruler is straight to a few hundredths of a millimetre over that length, which is all this needs. A dented or bent ruler is not: sight along it, or lay it on the straightedge of a table. Always measure with the same edge of the ruler.
Rocker only, or rocker + bend
The camera sees how far the running edge lies from the ruler, all along the blade. How the skate lies on the rig decides what that distance is: two ways, and a pair of skates needs two scans with one and four with the other.
How to scan
The blade at room temperature for 24 hours first. Steel changes its shape with temperature: a blade just in from the cold (or the car) can measure quite differently.
Line it up
The running edge parallel to the ruler, 1–5 mm of white paper between them, the ruler's ticks and numbers toward the blade. The camera straight down, the running edge through the middle of the picture, with the ruler's edge and its numbers in view: zoom out a bit more if you also want the cups in the scan. Nothing may move while you scan.
Rocker + bend: the blade on the 45° angle, a support pad under the boot, until the blade lies on the angle along its whole length.
Torch on, slide slowly
Turn the phone's torch on: a short exposure keeps the ruler's ticks sharp. Start recording, then slide the phone steadily from past the rear end to past the front, in 10–15 s, without stopping or pressing on the rig.
Upload the video
In Skates, under New scan: choose the skate, what to measure (rocker only, or rocker + bend), then the video — the file your phone recorded, not a copy that a messaging app sent: those are compressed, and blur measures worse. It stays on your device.
Check the ruler's edge
The first frame is shown with the ruler's edge found and drawn green. If it sits on another line, tap the ruler's measuring edge. Then Stitch: every frame is put together along the ruler and checked against its numbers.
Check the ends, measure
Two lines mark the blade's ends; drag them if needed (and the cups, if you mark them). Measure: the rocker and bend appear on the Skates page.
The slide, from above
Slide the phone one way only, from past the rear end to past the front of the blade, in 10–15 s. Then it is done: go back to the start for another pass rather than sliding back and forth.